Sunday, January 28, 2018

Adorama eVOLV 200 Flash - Power In Your Pocket?

Norman 200B Photo from www.fredmiranda.com
History Lesson: The Norman 200B Flash. This was, and for some still is, the real deal. The unit consisted of a head that features a user replaceable flash tube and a variety of different reflector configurations cabled to a  6-pound pack containing the electronics and the battery. This was definitely not a disposable flash, but one that could be repaired and re-built when the unit goes south. Original versions used NiCad batteries, but today many photographers now use a safer, more reliable sealed-lead acid battery instead. I've used them for photographing large groups of people, or when I need to use a large softbox or umbrella in the field. Its 200 watt-second output coupled with a portable DC power pack allowed photographers to bring studio-quality lighting almost anywhere. Norman is still selling these units, and the last iteration, the 200C, can be seen here.

I must state here and now that these units are durable and reliable. In my opinion, the greatest single drawback is the weight of the batery pack. The weight of thepack can be used in place of a sandbag when mounted with a Norman quick-detachable bracket at the base of the stand. A typical assignment, described here,  was one where I used a 200B in a medium sized softbox held aloft with a paint pole. 

A Viable Replacement? As a simple Joe Consumer type, I get my information about new products only when they become available to the general public, and often only when a dealer decides to put the item on sale, as was the case here.

Click here to access the Adorama website
In 2017, a new flash hit the market, the Godox AD200, which is known as the eVolv 200 when purchased under the  house brand Flashpoint from Adorama. I decided I needed to have one, not just for its output, but because it was capable of TTL exposure control over a variety of platforms by simply purchasing a dedicated camera controller. Since I straddle both the Nikon and Fuji works, this adaptability makes a lot of sense, although any unit that sold for as low a price point as this one may prove to be an expense, rather than an investment. The price was moderate, so I took the plunge.

Lightweight Wonder: Did I forget to mention that the complete head, body, and single battery weigh on two pounds?

Twin Heads: Another feature that attracted me was the interchangeable head feature. On the one hand, there was a standard, non-zooming speedlight head capable of a light spread suitable for a 35mm lens. On the other hand, it would accept a bare bulb, just like the Norman and my Amatar converted Vivitar flashes. When used inside a softbox, the bare bulb is a better solution than the narrow beam of a speedlight head, since bare-bulb light goes in every direction and without a pronounced hot spot.

After charging the battery, I decided to play with the bare bulb head, just to see if it would indeed recycle as quickly as advertised. Sure enough, it took less than 2 seconds to go from discharged state to fully charged, and without thinking, proceeded to fire a dozen or so shots in rapid succession. Pleased with the performance, I proceeded to disassemble the unit and return the pieces to the fitted case.

When I removed the flash tube, I noticed a roughness I hadn't experienced when assembling the unit. Closer examination showed that one of the contacts was seriously burned. Now flash overheating is a well-know fact of life, but in a world of speedlights powered by AA batteries, seldom encountered for the simple reason the the little AA batteries usually don't provide enough current to recharge a shoe-mounted flash to full power fast enough cause any damage to the flash itself. Here we had a flash and battery combination that could apparently reach peak output faster than the contacts could properly cool off.

Okay, I learned a serious lesson, and gave some additional thought to how I'll use this flash in the future. Before anything else, I'm going to attach a label on the dedicated flash controller that simply says "Slow Down",  a reminder that the unit needs to have time to cool off between shots. I'm sure this flash will become a suitable backup for one of the two Norman 200B units I routinely use for photographing the Adult School's Graduation Photo I do every year in June. I'll breathe a little easier knowing I have a backup should one of the Norman units get cranky on me.

I know that the catalog photo doesn't give you any idea of how large, or small, the unit is. I'll include some image of the flash "in action" when I have a chance to use it.

Sunday, January 21, 2018

Martin Luther King Day - 2018

Podium Shot: Okay, this is the sort of shot I usually do at the awards ceremony of the winners of the essay and poetry contest. Broken down by grade level, it is interesting to see young six and seven year olds rise to the challenge of their first public speaking adventure. But getting that moment when the speaker actually looks up can be a challenge, and this calm and collected tenth grader a little easier. She did look at the audience from time to time, and her phrasing allowed for predictable pauses for emphasis.

In the past, I was reluctant to "machine gun" a Nikon DSLR because the clacking from within the mirror box would be very distracting. But when using a Fuji T-1 with a 56mm 1.2 lens, my bursts were not exactly silent, but darned quiet. This shot, culled from a burst of about six shots, had lots of smile, bright catchlights, and most of her far eye. There is a price to pay, because emptying the buffer takes a while, and this time off target might result in a missed shot. It worked here, however, and I am glad it did.

The Big Group:  I thought for sure that this shot would run on the Community Page, since I had included the names and award level for each of the eighteen winners. I used my go-to technique of a dual speedlight on a lightstand for a key light in a open-shade courtyard. No real need for flash automation. I had plenty of time to get the exposure via trial and error, a quick and efficient way to work if you can make a selfie of yourself standing where my subjects would eventually be arranged.

Subject Identification: I streamlined the caption writing by asking the Master of Ceremonies to tell my subjects that a group photo would be made at the end of the ceremony, and needed to bring their certificates with them. As it turned out, they were all able to hold them up for the photo, and considering the high pixel count of the Fuji T2, I could almost read the names of of the final image. Instead,  I told everybody they would be dismissed (ever school child knows THAT word) after I made an individual photo of them. As soon as I made the "keeper" photo, I photographed the first row from left to right, getting  close enough for the certificate and a little bit of their clothing to show. By going from left to right, I knew the names would already be in order, and writing the caption was a snap.

Americorp Volunteers: I made a similar shot last year, which was not more of a grab shot made in bright sunlight which created some uneven shadowing that could be evenly filled.But today's overcast lighting made it easy to create a shot using a hand-held speedlight held high overhead for a key light, and the ambient lighting as a convenient fill.

Managing The Shot: I was pretty heavy-handed in my directions to my subjects. First, I had the subjects facing the light. By doing this, the ambient fill would be coming from the front anyway, and would add to the light provide by the key light. Next, I had them position themselves so they could see the camera. I had to remind them that they didn't need to look at the camera, but just be sure that the camera could see them. Next, I told them to look up, just so the shot would look more spontaneous, even though it was pretty obvious that it wasn't. Still, it worked out well, and everybody was pleased with the result.

To Send, Or Not To Send: I tend to overthink my assignments, trying to achieve a balance between technical quality, composition, and event relevance. When you think about the event, one has to acknowledge several approaches at play:

The Train: Showing a train, with people getting on board, might fail as a photo unless there is something that identifies the train as part of the event. Otherwise, it's just a photo of people getting on a train. However, a very nice image was submitted by the writer sent by the Journal, which you'll see below.

The Awards: In the photo I submitted, I showed a local activist who was named the Honorary Chairman of he event. Here I was counting on name recognition of a prominent member of the community, so I submitted it. I actually had a photo of all three of them sitting in the front row. Unfortunately, I couldn't use it because one of the recipients was an organization, and I didn't get the name of the representative receiving the award on their behalf.

We Shall Overcome: Singing has always been associated with the movement, and a photo of some people singing might work. I seldom manage to make photographs where are attractive when they sing, with the obvious exception of paid performers  If you time it properly, people singing a long "A" sound usually show a hint of a smile, and a photographer would do well to try to capture that  moment, if possible. I had more grimaces than smiles, so I scrubbed the singing photos.

Editor's Choices: The Editor In Chief chose to run this pair of photos, one of mine and one submitted by the article's author


Sunday, January 7, 2018

Painting With Flash

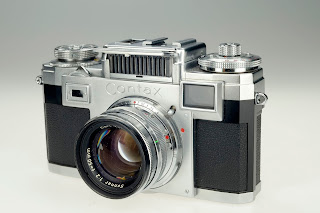
This classic Contax IIIa rangefinder camera, a gift from a family friend. It was her prized possession, and was so protective that she would not allow her (then) husband to touch it, let along make photos with it. It came with original instructions, box, and "never-ready" case, the latter a bit shop worn from the sharp edges of the top plate of the camera. Based on its serial number, its manufacturing date is placed in early 1961, and its overall mint condition makes this camera a rare prize indeed. Safely stored in my camera locker, I take  this flawless mid-century antique out occasionally to just admire its perfection.

Painting With Flash is a technique that is well suited for photographing objects that are highly reflective, such as the Contax. Done properly, the technique can create soft, non-specular highlights, incredible detail, and shadowless exposures similar to those you could achieve using a light tent, but with a much smaller investment in equipment. To make this shot, all you need are:
  • A clean, flat surface for your subject to support your subject.,
  • A camera capable of small shooting apertures (F16 or smaller),
  • Two fast-recycling flashes,
  • Light modifiers of your choice ,
  • A steady tripod, and
  • A dark room in which to work.
Lighting Is Cumulative: One quick note before we proceed: Light is cumulative. The shot will be the result of from twelve to fifteen individual flash exposures, each made from a slightly different position. This results in a "smearing" of the specular highlight to cover a larger surface without creating a "hot" highlight. Remember to that this a trial and error process, so it helps to remember how many flashes you had to make when you find the result particularly pleasing. In case you were wondering, Polaroid cameras were employed to check exposure during the pre-digital days.


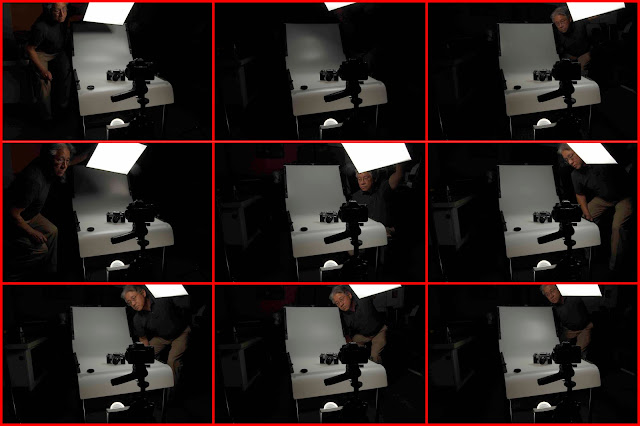
The Setup: This shot was an attempt to show you what's going on in the darkened workspace. In my left hand, you can see a speedlight with a small softbox, triggered by a remote trigger in my right hand (More on that later). On the floor, there is an optically triggered flash with a Gary Fong Cloud Dome aimed to direct light towards the foreground while lighting the scene from underneath. It's partially hidden by a book I used to prevent light spill into the camera mounted on the tripod. And yes, the plane of focus is on the tripod, which explains my out of focus-ness.

The Technique: Painting with a continuous light source, a technique often used by interior photographers, had the photographer use brush-like strokes to put layer upon layer of light on the walls and ceiling,  just as one might do with a paint brush. The process usually involved a photo flood and a long extension cord. But since flash is not a continuous light source, the technique is different. First, I focus the camera in the manual mode, since the camera won't function in total darkness. Next, I position my foot light to where I think it will produce the most pleasing light pattern beneath my subject. I purposely set the output to 1/8 or 1/16 of the necessary output (I'm guessing here) for reasons you'll understand in a moment. Finally, I set my hand-held key light to about 1/4 power to start, set the camera to a 20 second exposure. Now turn out the lights so there is no ambient light to affect the final exposure.


Next, I'll manually trip the camera shutter. I now have 20 seconds to position my key light, trigger it with the controller, and re-position the light about 8 inches from its current location, and trigger the flash again. I'll do this as many times as I can, which means about 15 pops if my key light flash is recycling quickly enough. Each time I trigger my main light, I am simultaneously triggering my foot light, so that after 15 pops, my foot light has given me the equivalent of a full power burst of light. And because I move the key light after each shot, the highlights grow, and flow, into each other, giving me the large, soft highlights I wanted in the first place.

New be forewarned, the results are not always perfect the first time. But with a little practice, you'll start to get photos with plenty of fine detail in the shadows (if you have any) and no burnt out highlights.

If I had it to do over, I put a bit more light on Contax's right side, which is noticeably darker than the left. But overall, the normal glare-prone chrome finish glows more than sparkles, and there is lots of detail in the knurling of the control knobs.

They really don't make them like they used to!

Tuesday, January 2, 2018

Bethlehem 2017 AD

Photo #1 1/8 second, F 5.6, ISO 500, Daylight Balance
This (Photo #1) is the image the Journal decided to publish for Bethlehem 2017 AD.The shot was probably chosen because there was a child present, providing more of a family friendly spin on the event. There are some technical reasons why I liked the photo. The two flash lighting allowed me to have highlights on the census taker, the scroll, and the quill pen, while an on-camera flash provided the fill lighting that would keep the details in the foreground. I didn't like the fact that the spill from the flash severely overexposed the woman in the background, but under the circumstances, that couldn't be helped. I admit it's easy to get into the "could have, would have, should have" mindset, but we don't get to make photos in a vacuum, and factors beyond our control are bound to interfere with the vision every photographer tries to create the moment before the shutter is released. The shot was good enough to submit, although I had some reservations about the overall exposure. Interestingly enough, there are no blocked highlights, and the image should have turned out better than it did.

Photo #3
Filtration: For the assignment, I had full CTO gels on both the key and fill speedlights. Two Nikon SB-800s were used, adjusted manually. The camera was a Fuji T2 with a 10-24 F 4.0 lens. Triggering was accomplished using the the SU-4 (optically triggered) mode. The photo of the mule (Photo #3) was made just for fun. folding LCD panel allowed me to make a low-angle shot between the fence slats without having to actually lie on the ground. Incidentally, the palm tree in the background was lit by a halogen spotlight placed there by the event sponsors.

I often use the Full CTOs to give the shots a warm, candle-light look. In this case, it didn't quite work, possibly because the mule's natural color (the white blaze on her face) was rendered too warm to be believable. I experimented in trying to correct the color balance in post production, but was really happy with the results. One problem with filtration - If the saturation of a any of the primary colors (red, green blue) goes "over the top", you can never recover a attractive relationship between these three primary colors.
 
Photo #4
Photo #4 was my personal favorite, but not something I could submit for publication. The goats in their pen are not easily recognized when seen from the rear - a small gesture of curiosity or affection by one of them could have made the photo, but alas, it was not to be. My costumed subject had a wonderful expression, but I didn't feel it was enough to carry the photo, especially when presented small in black and white, as my photos often are.

I was pleased with the two-light setup I used that evening. That bright fireball near the left edge of the photo is actually the key light, held aloft with by Cissie with a monopod. If you look at the highlight on the fence, you can see that the beam angle has been narrowed to form a spot of light centered on my subject's face. From the position at camera left, the speedlight provides a classic Rembrandt lighting, while the on-camera fill speedlight, feathered up slightly to prevent foreground overexposure, provides the necessary fill.


This is Jay, a photographer working with the event who I met last year. He too uses a Fuji XT2, but opted for the 16-55 2.8 as his main lens, one I passed on because it was too bulky and not wide enough for my taste We were experimenting with flashes, and I made this photo using my two speedlights and his flash, a Phottix I think, triggered in the optical slave mode. Since it wasn't equipped with a gel, its light is rendered impossibly blue when the camera is set to the Incandescent white balance preset.

I had considered trying to get a one of the rabbis to stand in front of the shadow cast by the menorah, but there wasn't time, space, or  (long) lens enough to make the shot come together.  I'll file this idea away for next year, and may experiment with the concept well before then.